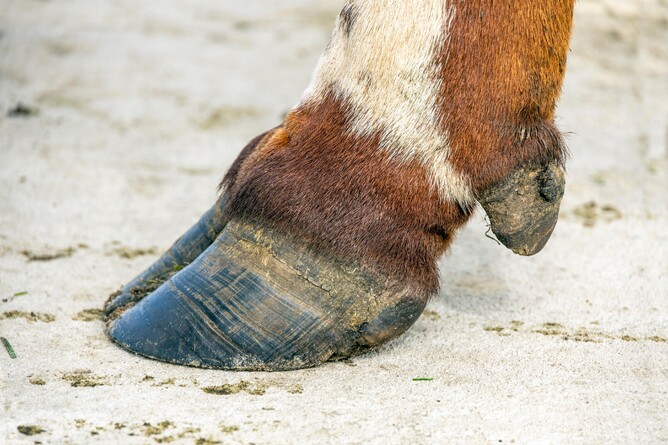
Between wet weather conditions and post-calving changes, the spring months tend to bring an increased risk of lameness issues on farm. Here's an overview of mobility scoring and corrective/preventative hoof trimming techniques to give you some guidance when dealing with lame cows.
Mobility scoring
This is a basic scoring system for dairy cows when looking for lameness:
0 – Bearing weight evenly on all four limbs and walking with a steady rhythm. Back is flat throughout and capable of long fluid strides. Not lame and unlikely to have a lesion.
1 – Steps appear uneven, either in rhythm or weight bearing, or the stride is shortened. The affected limb/s are not easily identifiable. Technically not lame and not likely to have a visible lesion but may be either recovering from lameness or in very early stages of disease.
2 – Uneven weight bearing on a limb that is immediately identifiable and/or obviously shortened strides. Usually but not necessarily an arch to the centre of the back while walking. Lame and likely to have a painful foot lesion. Foot should be lifted, inspected and treated, with pain relief also given.
3 – All the signs seen in score 2, but also unable to walk at a brisk human pace and generally can’t keep up with the herd. Very lame. Foot must be lifted ASAP, inspected and treated, with pain relief also provided.
90% of all lameness issues are caused by lesions in the hoof, so all score 2 or 3 cows should have their foot lifted for inspection and treatment. Ideally those that score 2 should have this done within 48 hours of being spotted and cows that score 3 even quicker (as soon as practically possible).
If you are unsure about mobility scoring, our vets are happy to run through this with you at any time, especially during this riskier period.
Routine trimming technique - The Dutch five-step method
This following trimming description will be based around a hind foot. When trimming a front foot, reverse the instructions for the inner and outer claws, as the inner claw bears more of the weight on the front foot, whereas the outer claw bears more of the weight on the back foot.
Step 1 – Inner claw
Cut one: Trim the length of the toe. It should be about 8cm long from the coronary band (where the skin meets the hoof) to the tip of the toe. A handy way to measure this is to use the width of your palm as a guide. Hold the foot with the edge of your palm lined up with the coronary band, where the other edge of your palm sits along the hoof wall will be roughly equal to where you need to trim to.
Cut two: Trim the sole of the hoof towards the toe end only. Think of bringing the edge of the toe you’ve cut to more of a point by trimming down the slope of the sole towards it. If you have not had to cut the length, this step will not require much work. Leave trimming the heel on this claw.
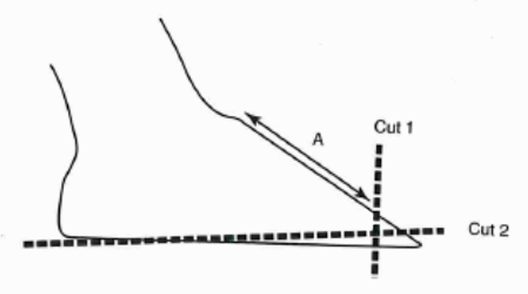
Figure 1. Lines show the cuts that will shorten the toes as described in Step 1 and 2. It also indicates the location for measuring the correct length of toe with the palm of your hand (A) .
Step 2 – Outer claw
Cut one: Repeat the same first cut to trim the length of the toe as the inner claw.
Cut two: Also repeat similar to the inner claw, trimming the sole of the hoof. However, the hoof sole will likely need to be removed all the way from the heel down to the toe, rather than just at the end of the toe as needed for the inner claw. The outer claw is usually thicker along the sole, so the whole sole will need trimming to level it with the inner claw. You should be able to sit your hoof knife evenly across both claws at the heel and at the toe when you are finished. The aim is to create even weight bearing across the two claws.
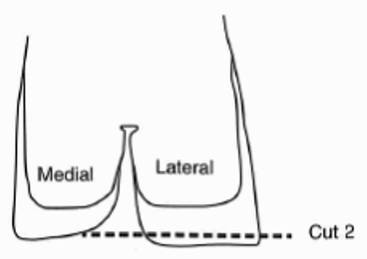
Figure 2. Line shows the cut that will level the toes as described in Step 2. Outer claw is called lateral, inner claw is called medial.
Step 3 – Sole dishing
Slice the soles of the claws with a hoof knife at the rear half of the sole area, towards the inside of each claw. This is called dishing out/modelling the hoof and will relieve the pressure at these points on each claw. The outer claw needs a shallower and wider hollow created as this is the claw where most bruising and lesions happen. Try not to go too deep into the sole – just a couple of cuts only – as you don’t want to lose strength or get down to blood either.
The key thing to remember with this step is that you are trying to avoid the hoof wall entirely if you can, as that's where the strength of the hoof for bearing weight will be placed.
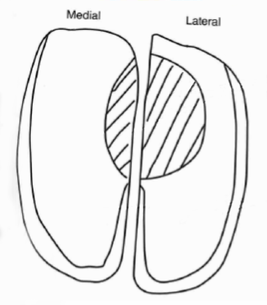
Figure 3. Lines show area of hoof sole that will undergo dishing out/modelling as described in Step 3.
Step 4 & Step 5
For a routine or corrective/preventative trim, Step 3 should be as far as you need to go. Steps 4 and 5 are therapeutic steps and involve treating claw horn lesions and skin lesions.
For more, check out our next article covering Steps 4 and 5 and common lesions.
Source: Bovine Surgery & Lameness Third Edition, by A. David Weaver, Owen Atkinson, Guy St. Jean and Adrian Steiner